Add a tattoo to an image and bring it to life
Sometimes inspiration don't come when you need it, so looking around for it I found this image. I thought it was a nice image and a good subject for a new tutorial.
This tutorial won't take you more than 30 minutes to go through it and it will show you how to use Clone Tool, Brush Tool, Pen Tool and how to apply lighting effects.
In order to do this manipulation you'll need three images
And now that you have the images let's learn how to blend them together to add a tatoo dolphin to an image and make that dolphin came to life.
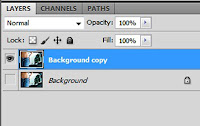 First open the image with the girl in Photoshop. Duplicate the background and make the original one invisible.
The image looks ok as it is. Open the image with the tattoo, copy and paste it into the project. Place it like you see below :
Change the blend mode to Multiply and lower the opacity to 87%.
Let's do this tattoo look more realistic !
Apply Gaussian Blur. Go to Filter > Blur > Gaussian Blur and set for the Radius 0,3 pixels.
Click on the little box in front of the Preview and check and uncheck it to see the result of Gaussian Blur filter.
Now take the Eraser Tool, set the Hardness to 25% and for Size choose 9 pixels and start erasing this parts form the tattoo :
And thats how you apply a tattoo on somebody's skin. :)
Open it and place it in the design. Grab the Pen Tool and select the dolphin. It's not necessary to select it's tail because you won't need it.
You have to inverse the selection, because if you press the Delete key now you will delete the dolphin and you want to delete the sky and the ocean around it. If you already pressed it, it's ok, you can always come back to the previous move. Hold down Ctrl key and press Z key. If you want to undo more then one move, press Ctrl + Alt + Z.
The default numbers of undo in Photoshop is six (if I remember correctly). You can increase this number going to Edit > Preference > Performance and from here change History States to what number you want.
I usually set it to 100.
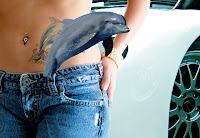
And now back to our design. Go to Select > Inverse (Ctrl + Shift + I) and hit Delete key on your keyboard. Press Ctrl + D to deselect.
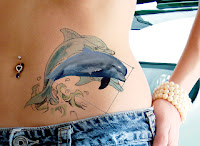 Use Free Transform (Ctrl + T) and place the dolphin above the one from the tattoo.
With the Free Transform still on, right-click on it and choose Warp, in order to make the dolphin's tail to blend with the tattooed tail.
Press enter to apply the transformation.
Make the tattoo layer active and using Eraser Tool, erase the dolphin underneath as you see below:
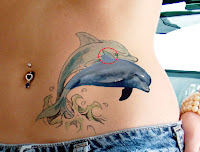 Make the dolphin layer invisible. Take the Clone Tool and clone the areas from the tattooed dolphin to cover the wing above it.
Make sure you have Aligned Sample set to Current Layer, so the Clone Tool will use for sample only the active layer.
Activate the dolphin's layer and apply a mask to it.
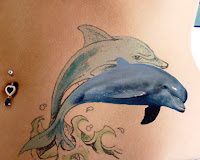
Take the Brush Tool, set Hardness to 0 and start erasing parts form the dolphin. Use the image for reference.
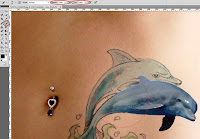
Now reduce the opacity and flow of the brush and erase again some parts, just so you can see some of the tattoo through the dolphin.
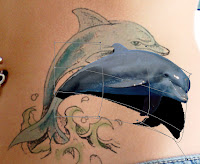 It's time to add the dolphin's shadow to create the 3D look. Hold down Ctrl key and click on the dolphin layer's thumbnail to activate its selection.
Go to Layer > Duplicate layer. Place the copy under the original, by dragging it with the mouse.
Set black for foreground color and hit Alt + Backspace. This will fill the selection with black. Delete its mask, you don't need it anymore. Choose "Don't apply" to the popup message. Deselect.
Use the Warp Tool again and place the shadow like this :
Erase the shadow from the left hand side to the middle of the dolphin, but only what's under it.
Reduce the opacity to 25% and the flow to 80% for the eraser.
Blur this layer with 1,4 pixels for Radius. Take the Eraser Tool again, set 60% to opacity (like you did above to Brush Tool) and erase its head and under the wing.
Now set the opacity to 10% and erase again, this time only over the head.
The image beside is what you may have
Let's add a little depth to the tail.
Take the Pen Tool and make a selection like you see beside :
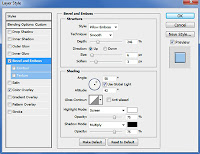
Make sure you have the selection in a new layer and fill it with white. Open Layer Style, check the Bevel & Emboss and apply this settings :
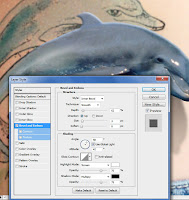
For Color Overlay choose #7fbbf1.
Make another selection like the previous one, and set the opacity for this layer to 58%.
Go to dolphin layer and apply Bevel & Emboss :
Select the layer on the top and press Ctrl + Shift + Alt + E. This will create a new layer with all the visible layers merged into it.
Now let's make the image focus on the girl and her tattoo, not on the car. To do that go to Filter > Render > Lighting Effects and apply this settings :
And that's it ! I hope you had fun!
PLEASE LEAVE A THANKS IF IT HELPED YOU.
Previous Tutorial Next Tutorial
This tutorial won't take you more than 30 minutes to go through it and it will show you how to use Clone Tool, Brush Tool, Pen Tool and how to apply lighting effects.
In order to do this manipulation you'll need three images
And now that you have the images let's learn how to blend them together to add a tatoo dolphin to an image and make that dolphin came to life.
CLICK THE IMAGES FOR BETTER VIEW OF SETTINGS
Step 1:
 First open the image with the girl in Photoshop. Duplicate the background and make the original one invisible.
The image looks ok as it is. Open the image with the tattoo, copy and paste it into the project. Place it like you see below :
Change the blend mode to Multiply and lower the opacity to 87%.
Let's do this tattoo look more realistic !
Apply Gaussian Blur. Go to Filter > Blur > Gaussian Blur and set for the Radius 0,3 pixels.
Click on the little box in front of the Preview and check and uncheck it to see the result of Gaussian Blur filter.
Now take the Eraser Tool, set the Hardness to 25% and for Size choose 9 pixels and start erasing this parts form the tattoo :
And thats how you apply a tattoo on somebody's skin. :)
Step 2:
You have to inverse the selection, because if you press the Delete key now you will delete the dolphin and you want to delete the sky and the ocean around it. If you already pressed it, it's ok, you can always come back to the previous move. Hold down Ctrl key and press Z key. If you want to undo more then one move, press Ctrl + Alt + Z.
The default numbers of undo in Photoshop is six (if I remember correctly). You can increase this number going to Edit > Preference > Performance and from here change History States to what number you want.
I usually set it to 100.

And now back to our design. Go to Select > Inverse (Ctrl + Shift + I) and hit Delete key on your keyboard. Press Ctrl + D to deselect.
Step 3:
 Use Free Transform (Ctrl + T) and place the dolphin above the one from the tattoo.
With the Free Transform still on, right-click on it and choose Warp, in order to make the dolphin's tail to blend with the tattooed tail.
Press enter to apply the transformation.
Make the tattoo layer active and using Eraser Tool, erase the dolphin underneath as you see below:
Step 4:
 Make the dolphin layer invisible. Take the Clone Tool and clone the areas from the tattooed dolphin to cover the wing above it.
Make sure you have Aligned Sample set to Current Layer, so the Clone Tool will use for sample only the active layer.
Step 5:

Take the Brush Tool, set Hardness to 0 and start erasing parts form the dolphin. Use the image for reference.

Now reduce the opacity and flow of the brush and erase again some parts, just so you can see some of the tattoo through the dolphin.
Step 6:
 It's time to add the dolphin's shadow to create the 3D look. Hold down Ctrl key and click on the dolphin layer's thumbnail to activate its selection.
Go to Layer > Duplicate layer. Place the copy under the original, by dragging it with the mouse.
Set black for foreground color and hit Alt + Backspace. This will fill the selection with black. Delete its mask, you don't need it anymore. Choose "Don't apply" to the popup message. Deselect.
Use the Warp Tool again and place the shadow like this :
Erase the shadow from the left hand side to the middle of the dolphin, but only what's under it.
Reduce the opacity to 25% and the flow to 80% for the eraser.
Blur this layer with 1,4 pixels for Radius. Take the Eraser Tool again, set 60% to opacity (like you did above to Brush Tool) and erase its head and under the wing.
Now set the opacity to 10% and erase again, this time only over the head.
The image beside is what you may have
Step 7:
Take the Pen Tool and make a selection like you see beside :

Make sure you have the selection in a new layer and fill it with white. Open Layer Style, check the Bevel & Emboss and apply this settings :

For Color Overlay choose #7fbbf1.
Make another selection like the previous one, and set the opacity for this layer to 58%.
Go to dolphin layer and apply Bevel & Emboss :
Step 8:
Now let's make the image focus on the girl and her tattoo, not on the car. To do that go to Filter > Render > Lighting Effects and apply this settings :
And that's it ! I hope you had fun!
PLEASE LEAVE A THANKS IF IT HELPED YOU.
Previous Tutorial Next Tutorial


![[Hack] DomiNations V2.0.81 LATEST VERSION JAILBREAK](https://blogger.googleusercontent.com/img/b/R29vZ2xl/AVvXsEgs6SJAU-z94ah7z-edusl2FHUiup6ZreQFeN5A9wjW5JxN0OrUrW6xmxEWP6cRTdX1gMi6dW1DEhUz700IB-PBuk1u1uzZ0ERCgldqLeuMgGhbfz-wCw-phIhyphenhyphen9Ks2zpoO_mDa8lrxvLv7/s72-c/10458386_338295233048481_6718903324450773386_n.jpg)

0 comments: