Create a Christmas Artwork in Photoshop

How to Create a Giant-sized Christmas tree in a Winter Field
Tutorial Resources
- dry winter field – night fate stock
- storming sky – vimark
- Winter Field – night fate stock
- Frosted Christmas Tree PSD – dbszabo1
- Winter Walking – tlst
- snowing texture – wchild
- Glitter Bokeh Texture Pack – regularjane
Step 1
Now, let’s start by creating a new image file, go to the Menu bar and click File > New, and then input the following values on their respective fields:- Preset: Custom
- Width: 3000 pixels
- Height: 3000 pixels
- Resolution: 300 pixels/inch
- Color Mode: RGB Color; 8 bit
- Background Contents: Transparent

Step 2
Now, we will be creating the sky of our Christmas image. To start, open “dry winter field” by night fate stock. Next activate the Rectangular Marquee Tool by pressing M on your keyboard.
Once activated, create a selection area around the sky as shown below:

Step 3
After that, activate the Move tool (V) and drag the image by first left-clicking on it and dragging it to our canvas. Once on the canvas, position it as shown below:
Step 4
Rename the layer to “sky 1″. To rename a layer, simply double-click on the words: “layer 1″ (you can find that on the layer window) to prompt a text box to appear.
Step 5
Now, activate the Transform tool (Ctrl/Cmd + T) and resize the image as shown below:

Step 6
Next, let’s add the second sky. Open “storming sky” by vimark and once open, activate the Rectangular Marquee Tool (M) and create a selection area around the sky of this image. See image below:
Step 7
Now, activate the Move tool (V) and drag this image to our canvas and put this layer above the “sky 1″ layer. To do that, simply drag this new layer on top of the “sky 1″ layer. Rename this layer to “sky 2″. Position it on the canvas as shown below:
Now, activate the Transform tool (Ctrl/Cmd + T) and resize this layer as shown below:

The result:

Step 8
Now, let’s blend these two skies together. To do that, simply change the Blending mode of “sky 2″Change the Blending mode of “sky 2″ to Soft Light and the Opacity, should still be at 100%.

The result:

Step 9
Next, we will darken the sky so it wouldn’t look flat. Start by left-clicking on the “sky 2″ layer and then press Ctrl/Cmd + Shift + N on your keyboard to create a new layer directly above the selected layer; once the box opens, input “darken 1″ on the name field.
Step 10
Now, we will be creating the snow covered field. To start, let’s open “Winter Field” by night fate stock. Once open, activate the Move tool (V) and drag it to our canvas. Make sure to put it above the “darken 1″ layer. Position it as shown below:
Rename this layer to “ground”. Activate the Transform tool (Ctrl/Cmd + T) and resize it as shown on the images below:


Step 11
Now, let’s blur the horizon line to give the impression that the snow is thick in the edge of the horizon. Start by activating the Eraser tool (E) and once activated, input the following:- Brush size: 100px
- Hardness: 0%
- Opacity: 100%
- Flow: 100%

Now Let's Erase

The Result

Step 12
Now, let’s brighten the horizon – let’s start by creating a new layer (Ctrl/Cmd + Shift + N) on top of the “ground” layer. Name this layer to “brighten”. Activate the Brush tool (B) then make sure that the active Brushes are the default brushes. The default Photoshop brushes are shown on the image below, if that’s not what you see, then follow the instructions below:
Right click the canvas while a layer is selected and while the Brush tool (B) is activated and then click on the button highlighted below:

Then click on “Reset Brushes” from the contextual menu.

Now, that that is done input the following settings for our Brush tool (B):
- Brush size: 700px
- Hardness: 0%
- Opacity: 15%
- Flow: 100%
- #: ffffff

Note: The #: ffffff is the color of the brush. To change it to that, simply do the following:

Once the Color Picker box opens, input the following on the # box:

Now, we’re all set to paint, use the brush as shown on the image below:

The Result

Step 13
Now, let’s create another layer (Ctrl/Cmd + Shift + N) above the “brighten” layer; name it to: “dusk”. Activate the Brush tool (B) and input the following:- Brush size: 900px
- Hardness: 0%
- Opacity: 15%
- Flow: 100%
- #: fffed5

The result of that:

Step 14
Create another layer (Ctrl/Cmd + Shift + N) above the “dusk” layer and input “darken 2″. Activate the Brush tool (B) and input the following:- Brush size: 1500px
- Hardness: 0%
- Opacity: 15%
- Flow: 100%
- #: 000000

The result:

Step 15
Next, create another layer again (Ctrl/Cmd + Shift + N) and name it “darken 3″. Activate the Brush tool (B) and input the following:- Brush size: 1500px
- Hardness: 0%
- Opacity: 15%
- Flow: 100%
- #: 000000

The result:

Step 16
Finally, let’s whiten the center part of the image and to do that, create a new layer (Ctrl/Cmd + Shift + N) above the “darken 3″ layer. Once done, activate the Brush tool (B) and input the following:- Brush size: 2000px
- Hardness: 0%
- Opacity: 15%
- Flow: 100%
- #: ffffff

The result of that should be similar to this:

Step 17
Now, let’s group all the layers that we’ve created by selecting all the layers and pressing Ctrl/Cmd + G. Once grouped, rename it to “Background”.
Step 18
In this step, we will be creating the huge and isolated Christmas tree in this empty field. To start, open the stock image: “Frosted Christmas Tree PSD” by dbszabo1. Note that this is a PNG file, so that means, upon opening, you could simply activate the Move tool (V) and drag the tree to our canvas. Once on the canvas, make sure that the tree is positioned above the “Background” group. Position the Christmas tree as shown on the image below:
Rename the Christmas tree as “Xmas tree”. Next, activate the Transform tool (Ctrl/Cmd + T) and resize the tree as shown on the image below:

The Result

Step 19
Next, reduce the “xmas tree’s” Opacity to 90%.

Step 20
Next, let’s activate the Eraser tool (E) because we would need to erase some parts of the Christmas tree to make it blend well with the image. Use the following settings for the Eraser tool (E):- Brush size: 400px
- Hardness: 0%
- Opacity: 15%
- Flow: 100%

The Result

Step 21
Now, we will add some decorative lights on our Christmas tree; to start, first create a new layer (Ctrl/Cmd + Shift + N) and name it “yellow lights”. Remember to put this above the “Xmas tree” layer. Once done, activate the Brush tool (B) and input the following:- Brush size: 30px
- Hardness: 0%
- Opacity: 100%
- Flow: 100%
- #: fffdd1

Step 22
Once done, let’s change the Blending options of these lights. To do that, right click on the “yellow lights” layer and once the contextual menu pops up, click on “Blending Options”.
Next, click on the Outer Glow tick box and then input the following: Outer Glow:
- Blend mode: Screen
- Opacity: 75%
- Noise: 0%
- #: ffffbe
- Technique: Softer
- Spread: 0%
- Size: 90px

Step 23
After that, reduce “yellow lights” layer opacity to 70%. The result of that will be like this:
Step 24
Next, let’s create a new layer (Ctrl/Cmd + Shift + N) which will still be part of our Christmas light decorations, name this new layer as “red lights”. Once created, activate the Brush tool (B) and input the following:- Brush size: 30px
- Hardness: 0%
- Opacity: 100%
- Flow: 100%
- #: ff8787

Next, let’s adjust the Blending options. Right click the “red lights” layer and click on the Blending Options tab from the contextual menu. Once open, click on the Outer Glow tick box and input the following:
- Outer Glow
- Blend mode: Screen
- Opacity: 75%
- Noise: 0%
- #: ff8787
- Technique: Softer
- Spread: 0%
- Size: 125px

After that, change the Blending mode and Opacity of the “red lights” layer to the following:
- Blending mode: Opacity
- Opacity: 70%

The Result

Step 25
What is a Christmas tree without a star on top? Now, we will create a new layer (Ctrl/Cmd + Shift + N) and name it “star”. Once done, activate the Brush tool (B) and input the following:- Brush tool: 125px
- Hardness: 0%
- Opacity: 100%
- Flow: 100%
- #: fffedf

The Result

Step 26
Now, let’s add some glow to the Christmas tree. First, create a new layer (Ctrl/Cmd + Shift + N) and name it “glow”. Once done, activate the Brush tool (B) and input the following:- Brush tool: 400px
- Hardness: 0%
- Opacity: 100%
- Flow: 100%
- #: fffeeb

The Result

Once you’re done, select all the layers from Step 3 to 4 and name this layer to “Xmas tree”.
Step 27
Now, we will be creating the lonely man treading the winter field approaching the giant Christmas tree. To start, let’s open “Winter walking” by tlst. Once opened, activate the Polygonal Lasso Tool (L).
Now, let’s create a selection area around the third guy on the right. Note: The Polygonal Lasso tool (L) is great in creating straight lines to form polygonal shapes, hence its name;

Step 28
Next, activate the Move tool (V) and drag him to our canvas and position this layer above the “Xmas tree” group. Rename this layer to “man”. Position the “man” as shown on below:
Step 29
Once done, activate the Transform tool (Ctrl/Cmd + T) and resize the “man” as shown below:
Step 30
Next, let’s adjust the Brightness/Contrast of the man. To do that, make sure that the “man” layer is selected and then go to Image > Adjustments > Brightness/Contrast and then input the following:
The Result

Step 31
Next, we will reduce the “man’s” Opacity to make it blend well with the images. Reduce it to the following: 40%
The Result

Step 32
Now, let’s create the man’s shadow. Let’s start by duplicating the “man” by pressing Ctrl/Cmd + J. Once duplicated, click on the duplicated layer and then activate the Transform tool (Ctrl/Cmd + T) and then right click on the canvas to activate the contextual menu; on the contextual menu click on Flip Vertical.
Now, the duplicated layer should be flipped vertical.

Step 33
Next, we will turn the duplicated layer into a real shadow. To do that, select the duplicated “man” layer and then go to Image > Adjustments > Brightness/Contrast and then input the following:- Brightness: - 100
- Contrast: - 100
- Use Legacy: Check

The Result

Step 34
Next, let’s blur the shadow a little. To do that, select the duplicated “man” layer and then go to Filter > Blur > Gaussian Blur. Set the Radius to 2 pixels then click OK.
The Result

Step 35
Next, let’s adjust the shadow’s shape according to the light from the Christmas tree. Activate the Transform tool (Ctrl/Cmd + T) and then right click on the canvas to open the contextual menu, on the menu, click on Distort.
Now, let’s distort the shadow.


The Result

Step 36
Next, change the layer opacity of the duplicated man’s layer to 15%
The Result

Step 37
Now, that we’re done, select all the layers from Step 5 and 6 and then group the layers (Ctrl/Cmd + G). Name the group to “Man”. In this step, we will learn how to create a vignette which will help enhance the focus on our subject. To start, go to the Menu bar and click on File > New and use the same settings we used to create our canvas. (Refer to Step 1). Take note, the background contents should be: WHITE. Once it has been created, go to Filter > Distort > Lens Correction. Find the tab Vignette and use these settings:- Vignette amount: -100
- Midpoint: +50

Step 38
Now that that’s done drag the vignette to our canvas using the Move tool (V) and put it on top of all the layers that we’ve created, and then set the following:- Blending mode: Multiply
- Opacity to 40%

The unblended Vignette will look like this:

Once the blending mode is set to “Multiply” it would look like this:

Step 39
To enhance the Christmas feel, let’s add some snow textures. Let’s start, by opening the stock image – “snowing texture” by wchild. Once it is open, activate the Move tool (V) and drag it to our canvas. Position it on our canvas as shown below:
Next, activate the Transform tool (Ctrl/Cmd + T) and resize the texture as shown below:

The Result

Step 40
Now, to make it blend with our image, just change the Blending mode and Opacity to the following:- Blending mode: Soft Light
- Opacity: 70%

The Result

Step 41
Next, let’s add the second texture – open the Glitter Bokeh Texture Pack zip file by regularjane and then unzip the files, once unzipped, choose “glitter bokeh1_8″. Activate the Move tool (V) and drag the image to our canvas. Position it as shown below:
Next, activate the Transform tool (Ctrl/Cmd + T) and resize it as shown below:

The Result:

Step 42
Now, to make it blend with our image, just change the Blending mode and Opacity to the following:- Blending mode: Soft Light
- Opacity: 40%

The Result

Now, select all these textures and then group them (Ctrl/Cmd + G). Name the group to “snow textures”.
Step 43
Let us now enhance color of our image. Start off by creating a Solid Color adjustment layer from the Create New Fill/Adjustment layer button on the Layer window.
Once the contextual menu opens, click on Solid Color:

Now, clicking on the Solid Color option will open the Color Picker box. Set the color to #000627.

Step 44
Make sure to put this Solid Color layer above the “Textures” group. Once done, change the Blending mode and Opacity of this Solid Color layer to the following:- Blending mode: Exclusion
- Opacity: 60%

Step 45
Next, let’s create a Color Balance adjustment layer from the “Create New Fill/Adjustment layer button”.
When it opens, input the following:
- Color Levels: -20, +5, 10
- Tone Balance: Midtones
- Preserve Luminosity: Check

Step 46
Next, let’s create another Solid Color adjustment layer from the “Create New Fill/Adjustment layer button”. Once the Solid Color box opens, input the following:
Step 47
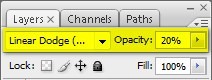
Change the Blending mode and Opacity to the following:- Blending mode: Linear Dodge (add)
- Opacity: 20%
Step 48
Once done, we will now move to the creation of a Gradient Map layer; from the “Create New Fill/Adjustment layer button” click on Gradient Map.
Now, when the Gradient Map box opens, do the following as shown on the images below:

Step 49
You’ll notice that your image is now Black and White, so let’s change the Blending mode and Opacity to the following:- Blending mode: Luminosity
- Opacity: 60%

The Result Should Be Similar To This

Final Result

Download the PSD file


![[Hack] Fifa 14 v1.0.2 for iPhone/iPad/iPod NO JB](https://blogger.googleusercontent.com/img/b/R29vZ2xl/AVvXsEh3DLN_lhqJ62My7UH5erbJNyGNNaU660uTpwmIsPpOYFXUqvaZNL6LGlhZAjntjPnTe50mfd2yqnRFlyz-S3GDrjlv6OdmMCL493dUParZhydZtrW_YnvIdnM-E2KdJ_IuymqcrjECii3n/s72-c/fifa+14+unlocked.jpg)
![[HACK] Temple Run (all versions) for android no root](https://blogger.googleusercontent.com/img/b/R29vZ2xl/AVvXsEgF-wVvxWPoaErZyEfsMuz6AyMDJ4ey6TvGR791KUdn_IhSrdsSUxVd5DoBXKFsOigBhDTMEheD4k199-rME1LzjpbzB7eqqq1GpIvh_uZ4jNK2rxsvNUGMMVMBt5TxqRP0KhQAr2ZS7Csd/s72-c/temple-run.jpg)

![[HACK] The Simpsons: Tapped Out v4.4.1 – Android](https://blogger.googleusercontent.com/img/b/R29vZ2xl/AVvXsEhUx_G1bUsE6cv_MM4yAKkyF8c37VoHHnH4kNz01gbrgSJ9IdMOXf7AuzBD1qhR8895VRu8uBpFmN9buAHHeiZPA5BbqnBtjlrkgOTR3E-6BplzsLi-SYWolOx23HRicJAMQhy7A9OU26V_/s72-c/the+simsons.jpg)
![[Hack] Temple Run 2 Modded APK ( NO ROOT )](https://blogger.googleusercontent.com/img/b/R29vZ2xl/AVvXsEgdqyy2RIaZTuA6kflfWIV3XvJW0GgD1dTEb7Qf8cnHRDEC6v3o7-BGOuyBtyCb0AtmGqgQuJkcJt6XaXKieJ9RwQskDTomO_iEhnVOE77uWYVInH4DEH6rcxsyfpfbolGJrXQjLoqoYk9J/s72-c/temple-run-2-07-700x393.jpg)
A few of the files are missing, are they anywhere else?
ReplyDeleteI'll upload the original PSD file please wait for update
ReplyDelete