Abstract Art Design
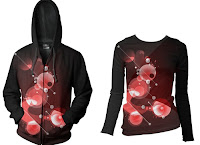 Designing abstract compositions with various colours, lines, and different forms are really amazing to work with. These form of arts exists in as early as the 19th Centrury and is still widely adopted around the world. It may evolved from early abstract art to modern abstract design art but the ways of describing visual experience to the artist still brings beauty and joy to the people who appreciate it.
CLICK THE IMAGES TO ENLARGE THEM
This Photoshop Tutorial aims to use basic Photoshop Tools to create an abstract masterpiece.
Program: PhotoshopStep 1:
Version: Anything from CS
Difficulty: Moderate
Estimated Completion Time: 1-2 hours depending on how well you know the tools.
Create a new document. The one on below is 500x362 if you wish to follow along exactly. The original was 4960 X 3500 if you wish to create the larger version.
Fill the background black using the fill tool (G).
Create a new layer (Layer > New > Layer) or use the shortcut CMD/CTRL, Shift + N depending on if you are a windows or mac user.
Select the gradient tool (G) Its under the same drop down as the fill tool if you cannot find it. At the top of the page find the settings (pictured).
Select the colour to be a dark red to transparent and then change the setting to radial.From the center of the image then draw out a circle

 Step 2:
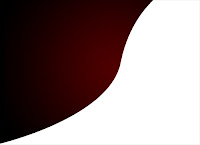
 Select the colour white, then grab the pen tool. Make sure the pen tool is on the shape layer mode (the first opinion at the top left).
Then simply draw a random curvy shape from one side of the image to the other, try and get as near to my result as possible Lower to 8% opacity in the layer panel
 Step 3:
Repeat the last step but this time draw a shape on the other side. Lower it to 5% opacity.
 Step 4:
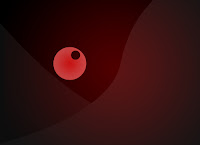
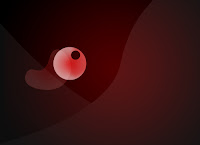
Using the circle shape tool create a red circle to the left of the center.
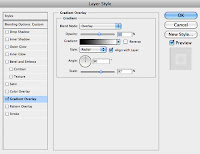
Right click the shape layer in the layers palette and click 'rasterize to layer' this will then make the shape editable. I then selected the circle marquee tool and made a small circle on the top and hit delete to leave a hole in my circle. This is optional. Double click the shape layer and apply the settings on your left
Step 5:
Create a new layer on top. Using a soft white brush paint around the outside of the circle. Set to overlay.
You then need to make it a clipping mask so it only effects the circle. Select layer > create clipping mask or simply tap CMD/CTRL + ALT + G.
 Step 6:
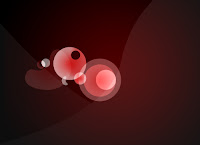
Step 6 is easy. Simply repeat step 4-5. Although with this one create a circle and rasterize, then go filter > Liquidfy.
Move it around to make it more bendy and awesome looking. Set the shape to screen on 18% opacity
Add some smaller shapes. Add a mixture of red and white. Play around with the settings to get a similar result to mine.
I would suggest using the screen and overlay modes at around 20-50% opacity.
I have also applied a radial gradient on a few of the circles. (Remember that the gradient has to be on overlay mode as well!)
Step 8:
You have the basic skills now to continue the image. I will write what I have done but if you need help with tools, look back through the tutorial.
Create 3 circles.
One large one, then on the inside place another one and then finally one on the inside of that.
The outer circle is red on screen at 74% opacity.
The medium sized is pink on overlay at 54% opacity.
Then the final circle is white on overlay at 100% opacity.
Step 9:
Add some lines into the image using the line tool under the shapes palette.
The line thickness will depend on the size of canvas you have used.
I then downloaded a brilliant pack from mediamilita contain 23 awesome circle brushes. link
Using the brushes on a new layer, place them at the end of each line. Varying the size of each.
 Step 10:
Use the techniques I have already taught you, keep adding more objects to the scene (add a mix of circles and semi-circles) Keep messing around with the overlay/screen features.
I used some star brushes on overlay as well.

Step 11:
The left hand side of the image looks pretty good now, so lets move on.
Using the pen tool create a new shape on the other side.
Using the circle marquee tool I have then deleted circles out of the shape and inserted the sphere brushes from earlier in the tutorial
 Step 12:
Duplicate the pen tool shape and rotate/resize it abit. The settings to do this can be found under the edit > transform location.
You can also use the liquidfy tool to bend the shape.
Step 13:
Using the line tool add another line, hold down shift to keep it perfectly straight.
Add a globe brush at the ends of each.

Step 14:
I added some more circles attached to the line.
These circles were all white (on overlay) with a gradient applied to them, keeping things nice and simple.

Step 15:
Keep adding some circles, just set on overlay.
 Step 16:
I have then add some final circles on overlay but by doubling them up on top on each other I have been able to create the effect.

Step 17:
Use the line tool to add some final lines to the image. I also added some on overlay.
Add anything else to the image you feel is needed. (I added some text with my name)
Step 18:
On a new layer, apply the image. (image > apply image).
Then add some splatter brushes on the layer above the background. Set the applied image as a clipping mask over the splatters.
We covered clipping masks earlier but if you have forgotten the shortcut is CMD/CTRL, ALT + G.
I have also applied the image onto a hoody and ladies tee, to show how it could be used on a real product.
We are then done!
You can now put the design on a T-Shirt just like what is shown below.
Previous Tutorial Next Tutorial


![[HACK] Subway Surfers Unlimited Coins (No Root)](https://blogger.googleusercontent.com/img/b/R29vZ2xl/AVvXsEjxXdVCStQjVqqu8moIKz7jF2LmqecaaWVrsFUP4JAbzDueqPH9lfRzlPd4VdBltin1SKN43JLHm26Uq-zcLEv-x2UdgDhk855qs5AQsaH9YazhEZj0HSV2T1PeQ3iVSH-s7mDIoArejlc8/s72-c/subway1.png)
![[Tutorial] Create an anti smoking concept design in photoshop](https://blogger.googleusercontent.com/img/b/R29vZ2xl/AVvXsEhEFHMxsiE2XXlJaq_3NCR9zypTETxS9NgZEmJommaQ3G0WMeH7kXSErMrnkyOas9eTutNvR_nl6yCKM0N3qbGBBAwbblg3T-G2_19KIQV9SvBwB2ibJ_zIY3u5jykwEIbyahBV-Qwnu9hr/s72-c/final+preview.jpg)
![[Hack] Fifa 14 v1.0.2 for iPhone/iPad/iPod NO JB](https://blogger.googleusercontent.com/img/b/R29vZ2xl/AVvXsEh3DLN_lhqJ62My7UH5erbJNyGNNaU660uTpwmIsPpOYFXUqvaZNL6LGlhZAjntjPnTe50mfd2yqnRFlyz-S3GDrjlv6OdmMCL493dUParZhydZtrW_YnvIdnM-E2KdJ_IuymqcrjECii3n/s72-c/fifa+14+unlocked.jpg)
![[Tutorial] Halloween Photoshop Manipulation](https://blogger.googleusercontent.com/img/b/R29vZ2xl/AVvXsEh5SyYc6pRrPG15YSBt_Lk8Gs3rJGMhbHSmDuznJYD8WV6CtKvyhPM0aYbFGJYPmPbVuVl_2yZvjmO6TPp9ZVs5vdSLtqvpLJ9ZFAYO-3TCBWH10EbL9o5oT_YXyLDprCVUBQOOkinOMW0L/s72-c/final+preview+for+halloween.jpg)
![[HACK] Contract Killer 2 v3.0.2 NO JB For iPhone/iPad/iPod](https://blogger.googleusercontent.com/img/b/R29vZ2xl/AVvXsEj8pB2nYWUMFJ9D_Yp6cL60c3dLDc2M_YuPeYVPriT36KhJTWTOV-fZkcrmBL-WTu1_HxoyPr-AQRfyI-9qvhI-0MmSkbdn9XRIgKGYOIHctc2E6W7rwZbxUl53GA0ZD8n-W8sLBjU2MeKi/s72-c/contract+killer.jpeg)
0 comments: