Create a Painting Of Fantasy Warrior
 Who does not like fantasy and the girls specially fantasy girls, not many people know how to draw them and do face some terrible troubles. Well Follow this tutorial and hopefully you'll learn a lot about painting your own fantasy character!
- Dan Lu Visi's brush pack - DanLuVisiArt
- Pose References - senshistock
(You can Click The Photos To Enlarge them)
Step 1
Start off with a basic sketch of the pose of your character, don't add any details, make only rough lines. If you do not feel so sure about your pose skills, don not hesitate to use one of SenshiStock references. If you want to continue in perfection you can just draw over them or you can practice it by not drawing lines over them but beside them to help you in future :).

Step 2
When you have completed your sketch don't forget to change resolution of your picture to 300 dpi (go to image > image size ). The bigger the picture, the more detailed your work can be, so use the biggest one your computer can handle. Final picture should be less than 25% of the orignal size.

Step 3
Now you need to prepare a base for the character's body. Choose a very HARD BRUSH ( you can use one of Dan Lu Visi which i mentioned above in top) with 100% Opacity and Flow, and draw the border of the silhouette on a new layer. You can use #c6b19c color, it's base color of skin.

Use Magic Want Tool (W) to select everything aroud the silhouette, then click Ctrl + Shift + I for making an inverse selection. If you filled the selection now, you'd probably fully fill the soft edges you can't even see (because you used a bush, not a pencil), but they need to be there for anti-aliasing effect. So, go to Select > Modify > Contract and choose 2-5 pixels. This way you'll recede from the soft edge and will be able to fill the inside without any problems (use Paint Bucket Tool (G) or go to Edit > Fill).


Step 4
Now it’s time for a background. When you design a character, you don’t want the background to be too disturbing, still, without it the character looks fake (as if it don’t live in any world). To get a nice effect you can use a dark-light trick – one part of the background is dark, and the light source is quite strong and visible. So, our warioress is standing on the ground – paint it with hard brush with low Flow – and there’s a sky behind her – paint it with soft brush/cloud brush. Use glum, unsaturated colors, as it’s just a background for the real background.

Define the background with more saturated colors. In my scene it’s night (so the sky is dark-blue) and there’s a fire somewhere near (maybe the warioress has something to do with it?). Blue-orange is the most classic combination and it works everywhere, trust me. Even in the day scene it’s good to use both colors to light (orange as sun’s light, and blue as sky’s reflection).

Now I’ll show you a trick for strong lights – pick a light color and choose Linear Light mode for your brush. Before touching anything, make sure your background is on one layer. Then paint the light on it, using this mode frugally, since too much light could kill the scene (unless it’s your style, then go on).

Step 5

Take a hard brush with low Flow (15-20%) and paint the shadows. Don’t dive into details, this phase is supposed to help you get rid of the sketch. Remember about light source!

Step 6
Before we dive into details of the body, it’s good to complete the outfit – it’s going to cover a lot of skin, so painting these parts of skin would be a waste of time. Sketch the outfit with strong lines on a new layer outside of the clipping mask.

Now do the same as with the body – paint a base for the outfit, clip the sketch and lower its opacity.

Hair can be considered as a part of the outfit too. Paint the strands with hard brush (60-70% Opacity), then fill empty spaces on a lower layer to fully cover the head. Cross the strands all the time, even the straightest hair tangle. It’s good to draw the strands as X’s, not lines.

Let’s come back to the outfit. Part of it will be made of red leather, the other part – of metal.
Red should be shaded with dark green (according to color theory), so use it to shade all the leather parts. I used the same shade to change the color of boots and pelts too, too much red would look… weird. When it comes to the metal, shade it with everything that surrounds it – sky, light, red leather…

Some people have problems with making lineless artwork sharp. A good trick helping it is not to use a light on a whole lighted surface. Leave some base color at the border – very thin one – and you’ll see how good it looks from distance.

Use the colors of the sky to put lights on every surface. Try to add some depth to it, and follow the trick from the step above all the time.

Step 9 - Leather Brush
Create a new file and draw some scratches there. Avoid putting any details, it should be consistent and almost round in shape. Use only black. When you’re done, choose Edit > Define Brush Preset. Now you’ve got a new brush!

Now you need to adjust the preferences to your needs. These are my options – you don’t need to follow them, feel free to experiment.

Now create a new layer within the outfit’s clipping mask and use your new brush to paint leather texture. Don’t leave it as it is, shade it too, cover a little with other tones – make it natural.

Step 10
Shade all the outfit carefully, draw the borders – finish all the leather elements so that you can leave it for now.

Step 11
Color the pauldron roughly – simulate some scratches, then put some colors and cover them with soft painted grey.

When metal’s surface is polished, it reflects everything around it. So, look around and paint it on the pauldron. Use hard brush, paint quickly, and use Screen Mode when you need to stress any light.

The heels are in the shadow, so they won’t reflect so much light. Paint them with dark colors and don’t forget to blend them into the ground.

Use the method you’ve just learnt to every metal surface in the outfit. You can also add some details, like buckles.

Step 12
To create a chain-skirt we’ll need another brush. It will save you a lot of time – who’d like to draw a link by link?

Use this brush to paint the skirt. If you’ve got any problems with it, try to change some brush options – you may find a better way than mine.

Some part of the skirt is exposed to light – and since it’s metal, it should strongly reflect it. You can also change the skirt’s edge by making a holes in it with Eraser Tool (E).

Step 13
It’s time to complete the hair now. First shade it in normal way, according to color theory (green on red).

Now use environmental lights to cover the hair, just like you did with the outfit.

Step 14
We completely forgot abut the sword! Sketch it using Line Tool to stress its direction, then sketch the hands that we skipped. If you have problems with them (who doesn’t?), there’s one tip for you: take a picture of your own hand in the position you need, then use it as reference. Works every time!

Shade the hands without details, just to get rid off the sketch.

Prepare a base for the sword – when it comes to the blade, it’s good to use Pen Tool (P) to keep the shape. If you prefer to use Brush, do it with 100% Opacity and Flow.

Create new layer over the sword’s base and convert it to Clipping Mask, then put basic colors on it. No details yet!

Ok, now you’re allowed to put details. First make sure what the elements are made of, and use a proper technique for them. Should they be mat or shiny? Do they reflect every color around them?

Use advice from Step 11 to simulate metal surface of the blade. It should be easy for you now. Tip: when you want some little part to shine stronger, first draw the light with Hard Brush, then stress it with Soft Brush in Screen Mode.

Step 15
Now it’s time to come back to the skin (of course, we could’ve start from it, but then you wouldn’t want to cover it with the outfit…). Use dark green to paint the shades (hard brush, low Flow). She’s going to look a bit dirty, but let it be for now.

Take a soft brush and paint the skin with it, just to blend the darker parts with base color. It’s a great trick, gives almost glossy effect.

Step 16
We’re going to repeat Step 15 with the opposite shade now. Use very light green with Linear Mode of the brush and paint the lights carefully (hard brush, low Flow).

And again, use soft brush to blend the color of the skin.

When adding life to the skin you can realize some of the things you’ve finished before don’t look finished anymore. For example, metal parts should be much more shiny than the skin. Add some light to them with Screen or Linear Light Mode.

Step 17

Step 18
Time to add some details on the face. When it comes to the eye, it’s a good habit to always put blue light on it, using hard brush in Linear Light Mode. Whatever the colors around, I always use blue. Don’t ask me why, it just works

Step 19
There are a lot of “skin brush” packs on the Internet, but if you want to make your own and not to care about any credits, you should be able to do it now. It may look like this below, but I’m sure you can do better. When it comes to the options, the ones from leather brush should work here too.

Use your brush to cover all the skin (light green, Linear Light, very small brush). You may not see the difference, but it’s a detail that looks great when printed.

Step 20
The last thing here will be adding texture to… everything. There’s certainly some dust in the air, so it can’t be smooth. I’ll show you the trick that’s used by the greatest artists: create a new layer on the top and fill it with some dark color. Then go to Filter > Noise > Add Noise.


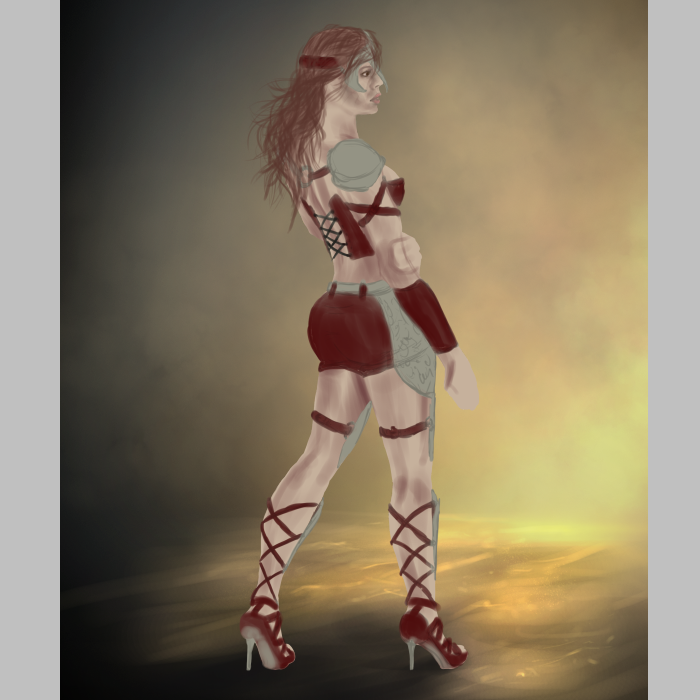
Final Results


![[Hack] Fifa 14 v1.0.2 for iPhone/iPad/iPod NO JB](https://blogger.googleusercontent.com/img/b/R29vZ2xl/AVvXsEh3DLN_lhqJ62My7UH5erbJNyGNNaU660uTpwmIsPpOYFXUqvaZNL6LGlhZAjntjPnTe50mfd2yqnRFlyz-S3GDrjlv6OdmMCL493dUParZhydZtrW_YnvIdnM-E2KdJ_IuymqcrjECii3n/s72-c/fifa+14+unlocked.jpg)


0 comments: