[Tutorial] Intense Sunset Photo Manipulation
Resources needed:
 Step 1:
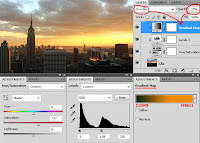
Power up Photoshop and create a new blank document 1500x1200 pixels. Open the city background stock and paste it on a new layer. You can delete the blank background layer if you want.
Now you will have to make some adjustments to this city sunset image. This background will be your guide to make color and contrast adjustments to the other elements that you will add on the scene later on.
The way you make adjustments is by using Adjustment Layers because they are non-destructive and you can edit the values at any time. The adjustment layers icon is located on the bottom of the Layers Palette next to the folder icon. You can also access the adjustments from the menu Layer>New Adjustment Layer.
So, go ahead and add three adjustment layers: Hue/Saturation, Levels and Gradient Map. Make them clipping masks by right clicking and choosing Create Clipping Mask. Use the values shown in the image.
 Step 2:
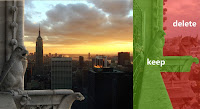
Now that you have the background image ready, open the gargoyle balcony stock. Get the Pen Tool (P) and start drawing a path along the edges of the structure that you want to keep. See image below for details.
Step 3:
As you see, the balcony stock image has a gargoyle standing on the right side and after cutting the image, the claws of the gargoyle are still visible. You can get rid of them very easily by duplicating part of the balcony. See image below.
 Step 4:
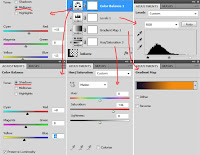
Now you have to make some adjustments to this balcony so that it fits the background color tone and contrast. To achieve that, you will have to repeat the process that I explained on Step 1. Use Adjustment layers to give the balcony a yellowish tone.
Step 5:
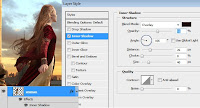
Now that the color of the balcony looks right, you have to recreate a light cast that comes from the sun on the right side of the image. For that I added Inner Shadow to the balcony layer.
 Step 6:
Open the woman stock image and place it on the balcony facing the sun light. Just as you did with the balcony, you have to make adjustments to the woman as well in order to make her blend with the surrounding scene. Again use adjustment layers.
Because the woman is close to the wall, and facing the sun, you must recreate the lights and shadows properly. Luckily the lights on the woman look perfect, coming from the right side. That's why I chose this stock image, because the light was coming from the same place as the light from the background layer. The only thing you will have to do is recreate the shadows on the woman's back. Again, I used Inner Shadow.
 Step 7:
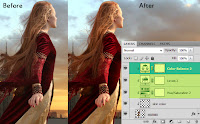
The skin color of the woman is a bit pale, it needs to be more yellow because of the sun light. To achieve that, I created a new clipping mask layer and I painted over the skin with a small brush. See image below.
 Step 8:
Add some more adjustment layers and increase the contrast using Levels and also increase a bit the Saturation. I also wanted to give the woman a general yellow color tone so I used a Color Balance adjustment layer and increased the yellows.
Step 9:
Now paint some shadows on a new layer below the woman layer so that it looks as she's really standing there. Use a soft, low opacity brush. If you pay attention you will see some grass on the bottom part of her dress. You can get rid of it using the Clone Tool (S).
Step 10:
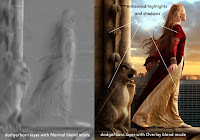
Add some birds using the birds brush. You can create more depth and realism if you add some Inner Shadow on the birds layer and decrease the Opacity of the layer to 90%, see image.
 Step 11:
One thing that I almost always do to all my manipulations is dodge and burning. I created a new layer, filled it with 50% gray from Edit>Fill and set the blend mode to Overlay and then I used the Dodge tool to enhance the highlights and the Burn tool to enhance the shadows.
 Step 12:
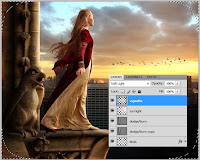
Now create a spot light where the sun is, using a big soft brush and a very light yellow color. Change the blend mode to Soft Light and reduce the Opacity to about 70%.
 Step 13:
One final thing that I made is a vignette effect. It's very easy to do. Select the Rectangular Marquee Tool (M) and on the top options bar set Feather to 100px. Then create a new layer on top of all the other layers and select the entire canvas using the mouse because with Ctrl+A the feather will not be applied.
You will see that the corners of the selection are rounded because of the feather. Now invert the selection with Shift+Ctrl+i and fill the selection with black by using the keyboard shortcut Alt+Backspace or from the menu Edit>Fill. Set the blend mode to Soft Light.
Final Result:
When your ready to export you creation as jpg and post it on a website sharpen it first. It will look a lot better. You can use the Unsharp mask or the Paint Daubs filter located under the Artistic filter.
Hope you enjoyed the tutorial.
Download Psd


![[Hack] DomiNations V2.0.81 LATEST VERSION JAILBREAK](https://blogger.googleusercontent.com/img/b/R29vZ2xl/AVvXsEgs6SJAU-z94ah7z-edusl2FHUiup6ZreQFeN5A9wjW5JxN0OrUrW6xmxEWP6cRTdX1gMi6dW1DEhUz700IB-PBuk1u1uzZ0ERCgldqLeuMgGhbfz-wCw-phIhyphenhyphen9Ks2zpoO_mDa8lrxvLv7/s72-c/10458386_338295233048481_6718903324450773386_n.jpg)

0 comments: