[Tutorial] Toxic Liquid Container Icon
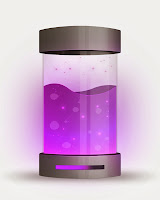
 Hey fellow design enthusiast, here’s a new Photoshop Tutorial to create a Toxic Liquid Container Dock Icon. I’ve created this icon for my personal use as a recycle bin dock icon, here’s how to create this nice icon.
Step 1 – THE New Document and Background
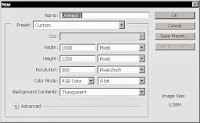
Let’s Start by opening photoshop and create a new document, I choose 1000x1250px with a transparent background. Next fill the background with black, go to Edit – Fill – White.


Step 2 – Top Part and Bottom Part
In this step we’ll create the Top and Bottom parts of the container, start by selecting the Rectangle Tool (U), then create a rectangle shape with a grey color, I used #7d7d7d, when the rectangle is done, select the Direct Selection Tool (A) and click on the rectangle shape, then with the Pen Tool (P) add two anchor point in the top and bottom horizontal lines of the shape. When that’s done reselect the Direct Selection Tool (A) and select the two new anchor points and move them down a little bit to give a curve effect to the rectangle. Rename the rectangle layer Top Part and place it in a new group named the same.
Let’s add some colours to this top part by adding a Gradient Overlay layer style, Layer – Layer Style – Gradient Overlay and add a gradient with some black and grey colors.
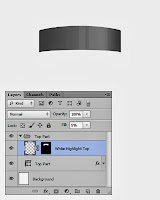
Select the Rectangular Marquee Tool (M) and create two rectangle shape selections on the top part, create a new layer named White Highlight Top, and fill those 2 selections with white. Change the fill of the layer to 5%, to keep those highlights only on the top shape, let’s create a layer mask on the highlight layer, go back on the Top Part layer and white holding the Ctrl key click on the layer preview in the layer box, then go back on the White Highlight Top layer and create a layer mask, Layer – Layer Mask – Reveal Selection.

Now duplicate the Top Part group and rename the duplicated group Bottom Part, use the Free Transform Tool (Ctrl+T) then flip the shape horizontally, Edit – Transform Path – Flip Horizontal.
Step 3 – Progress Bar
Let’s add some details to this container with creating a progress bar. Select the Rectangle Tool (U) and create a rectangle on the bottom part. Duplicate this rectangle layer, create a layer mask on this new layer and with a Soft Rounded brush with the Brush Tool (B) and black for color hide some of the right part of the progress bar.
Now we’ll add some layer styles on this duplicated layer, double click on it or go to Layer – Layer Style and add some Inner Shadow, Inner Glow and a Purple Gradient Overlay.
Place all the layers we created in this step in a new group named Progress Bar with Liquid.
Step 4 – Progress Bar Highlight
Create a new group named Progress Bar Highlights, place it in the Progress Bar with Liquid group.
Create a new layer, select the Brush Tool (B) and with a big sized Soft Rounded Brush and a purple color, paint on the progress bar, then apply the same layer mask on this layer than on the we created in step 3 to hide some part of the highlight.
Create a new layer, this time paint with a white color on the progress bar with the Brush Tool, apply the same layer mask than before.
Make sure those two layers are placed in the Progress Bar Highlights group and change the Blending Mode of this group to Color Dodge.
Step 5 – Glass Container
Select the Ellipse Tool (U) and create an oval shape under the Top Part, duplicate this shape and place it on top of the Bottom Part. Place the layers of those two shapes under the Top and Bottom Part groups in the layer box.
Select the Rectangle Tool (U) and create a big rectangle shape between the top and bottom part, this will be the glass container.
Let’s add a Gradient Overlay layer style on this shape, with 50% opacity on the edges and 0% in the middle of the gradient.
Rename the layer Glass Container, change the opacity of the layer to 20% and its fill to 0% then place this layer in a new group named Container and Liquid.
Step 6 – Liquid – Part 1
Let’s add some liquid in this container, select the Pen Tool (P) and create a purple color shape with curves on the glass container. Next add some layer styles on this shape with those parameters.
Select the Rectangular Marquee Tool (M) and create a selection a little bit smaller than the glass container, then create a layer mask on the liquid layer with this selection.
Create a new liquid shape with the Pen Tool (P), place its layer behind the first liquid layer, apply some more Layer Styles like in Step 6.
Apply the same Layer Mask on this second liquid layer than in Step 6 and rename both Step 6 and Step 7 layers, Purple Liquid.
Create a new layer, rename it White Highlight and with the Brush Tool (B), white color and a big Soft Rounded Brush, paint on the right bottom corner for some highlight. When its done, apply the same layer mask that’s on the Purple Liquid layers and change the opacity of the White Highlight layer to 20%.
Step 8 – Glass Effects
Let’s add some color effects on the glass, create a new layer, select the Brush Tool and paint with a purple color on the glass part. Repeat the same process on a new layer but with white this time, apply the same Layer Mask on both layers than in Step 7, place those layers in a new group named Highlights then change the blending mode to Color Dodge.
Step 9-10 – Sparkles and Details
In this step we’ll add some sparkles and details, let your creative side turn on and add some sparkles and others details using the different brushes you’ve got. Just add on some of those details layers styles like I did.
Step 11 – Reflection
Select the Rectangle Tool and create a white vertical stripe, this will be used for some reflection on the glass. Make sure its height is a little bit higher than the glass. Change the opacity to 10%, repeat the same for an other stripe this time less wide.
Duplicate and merge those two stripe layers by selecting the two layers and press Ctrl+Alt+E.
Apply a Motion Blur filter on the new layer with an angle of 0° and a distance of 40px, place this layer under the two original stripe layers.
Step 12 – Other Color Highlights
Create a new layer, select the Brush Tool with a white color and paint on the Top and Bottom parts of the Icon. We’ll need to create a layer mask on this new layer so the highlight just appear on the Top and Bottom Parts, in order to do this you’ll need to make a selection of both parts at the same time, select the Bottom Part original layer, and while holding the Ctrl key click on the small preview of this part in the layer box, then with this selection active, select the original Top Part layer, hold the Shift and Ctrl keys and click on its small preview in the layer box. Go back to the highlight layer we’ve created at the beginning of this step and create a layer mask. Change the fill of this layer to 25%.
Repeat the same process on a new layer but this time with a purple color, a 100% opacity and fill and Color Dodge for the blending mode.
Step 13 – Shadows
Let’s add some shadows to this icon, select the Ellipse Tool, and create a black oval shape, place the layer under all this others except the background layer. Apply a Gaussian Blur filter with a radius of 25px, Filter – Blur – Gaussian Blur.
To finish select the Brush Tool, with a purple color paint on a new layer behind the Glass, make sure this layer in just in front the shadow we’ve created previously.
Final Result
Here’s we are with a nice new Toxic Container Icon, if you want to use it as recycle bin like me you’ve got to save two versions one with liquid and one without the liquid and the progress bar empty.


![[Hack] Fifa 14 v1.0.2 for iPhone/iPad/iPod NO JB](https://blogger.googleusercontent.com/img/b/R29vZ2xl/AVvXsEh3DLN_lhqJ62My7UH5erbJNyGNNaU660uTpwmIsPpOYFXUqvaZNL6LGlhZAjntjPnTe50mfd2yqnRFlyz-S3GDrjlv6OdmMCL493dUParZhydZtrW_YnvIdnM-E2KdJ_IuymqcrjECii3n/s72-c/fifa+14+unlocked.jpg)


0 comments: