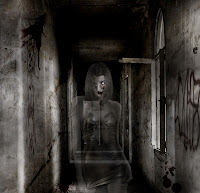
[Tutorial] Sexy Ghost in the Uninhabited House
 I never did a dark art actually but when I made this Photoshop Manipulation Tutorial, I realized that it met my fancy much more than I've thought :D. Hope you all will enjoy it. We are going to combine different images and use some nice Photoshop splatter brushes to create a frightful scene for the Halloween.
Resources needed:
 Step 1:
Open the corridor pic, crop, re-size and then duplicate it.
 Step 2:
Move cracked texture into our file and transform as shown:

 Move it to the left side of the pic and change mode to Soft Light 100%. Duplicate it and move to the right. Lower Opacity to 50%. Add Layer Mask for two texture layers and use soft black brush to eraser some parts as selected:
Step 3:
Open the pic included the model. I use Magic Wand tool to Extract her out of pic.

Move her into our document and re-size:

Duplicate this layer and desaturate it. Choose Edit - Fade:

Step 4:
Create a new blank layer, set to Overlay:

Then use Dodge (Highlight range) and Burn Tool (Shadows Range) with 100% Opacity to paint over the model skin, face, eyes, forehead to make a terrible look.
 Step 5:
Create a new layer, use Soft Brush, 2px with color 2e2a28 to draw near her breast like the pic below to make a Claw like scratches:

Step 6:
New layer again, use Soft brush 1 px with same color draw some lines in horizontal:

Step 7:
I create a new layer with Overlay Mode, use Burn Tool to darken the scratches on her skin:
 Step 8:
Create a new layer, and make sure foreground color and background color is 2e2a28 and white. Choose Filter - Render - Clouds:

Set this layer to Multipy 100%. Place it under the girl layers. We have:

Step 9:
Create a new layer, use Splatter Brushes, color 670813 to paint on the wall and set to Multipy 100%. I added a Layer Mask to clear some parts. Duplicate this layer.
Step 10:
New layer and I use Soft Brush, color 4e0f02 painting on the ceiling, change the Mode to Multipy 60%. Move it under the girl layers.

Step 11:
Make a new layer with Multipy Mode 100%, I use Splatter Brush, color 5a1508 to make a bloody mouth:

Step 12:
I use Burn Tool in the same way above (with soft light mode) to darken her clothes.
 Step 13:
Press Ctrl+Shift+Alt+E to merge all layers. Hide all layers except top layer and all layers under the girl ones like the pic below:

Add a Layer Mask and with soft black brush, Opacity 45%, Flow 45% to blur the girl (except her eyes) to make the "ghost" effect:
 Step 14:
Create a new brightness/contrast layer, then use soft black brush to eraser the girl.
Final Result:


![[Hack] Fifa 14 v1.0.2 for iPhone/iPad/iPod NO JB](https://blogger.googleusercontent.com/img/b/R29vZ2xl/AVvXsEh3DLN_lhqJ62My7UH5erbJNyGNNaU660uTpwmIsPpOYFXUqvaZNL6LGlhZAjntjPnTe50mfd2yqnRFlyz-S3GDrjlv6OdmMCL493dUParZhydZtrW_YnvIdnM-E2KdJ_IuymqcrjECii3n/s72-c/fifa+14+unlocked.jpg)


0 comments: