[Tutorial] Color in the Sky Wallpaper
 Hey Guys, here's a new Photoshop Tutorial, I'm going to teach you how to create a vibrant color text wallpaper with using some nice Textures and playing with the Gradient Tool.
Resources needed:
- textures 80 by Sanami276 LINK
- 10 Old Paper Texture by Bleeding-Dragon LINK
- Above The Sky 3 by TKO LINK
- MOD Font on Fontfabric LINK
Step 1 - THE New Document and Background Colour


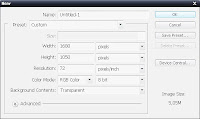
Let's Start by opening photoshop and create a new document, I choose 1680x1050px with a transparent background. Then fill the background with white, go to Edit - Fill - White and rename the layer Background.
Step 2 - Background Textures

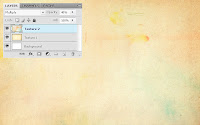
 Now let's create the background using 3 textures I found on deviantART and sxc.hu, you can find the links to download the textures in the Resources Needed section. We'll first use the paper texture from the texture pack called 10 Old Paper Texture by Bleeding-Dragon; I used the texture number 3 for this wallpaper. Open the texture in photoshop, then drag it into the wallpaper document, use the Free Transform Tool (Ctrl+T) to resize or rotate it, rename the layer Texture 1 and change its opacity to 80%.
 Next we'll use a watercolor texture from the texture pack Textures 80 by Sanami276, I used number 5, open the image in photoshop and drag on the document, use the Free Transform Tool to resize or rotate it, next change the blending mode to Multiply, the opacity to 40% and rename the layer Texture 2.
Let's now use the sky/clouds texture called Above the Sky 3 by TKO. When you've downloaded the texture do like before, drag it into the document. Next desaturate this image by pressing Ctrl+Shift+U or Image - Adjustments - Desaturate, change its blending mode to Overlay and rename the layer Texture 3.
Step 3 - Colorful Text
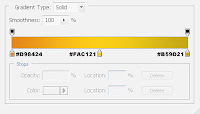
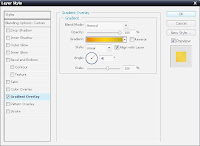
In this step we'll create the text using a lot of the Gradient Overlay layer style. Start by writing some text, to make it easier to play with the letters, I created 1 letter at a time so for my color text I've got 5 layers, one for each letter. To create the text I used a font called MOD from fontfrabric.com, you find the link to download this font in the Resources Needed section. Write your text in black, next apply a Gradient Overlay layer style on each letters, I used 5 different gradients, Layer - Layer Style - Gradient Overlay, change the opacity of the font layers to 70% and group them in a new group named COLOR Text.


Next use the Move Tool (V) and play with letters, to give a nice effect place the letters a little bit on each other.
To finish this step, select the Rectangular Marquee Tool (M) and make a selection on the bottom part of the text, then select the text group and create a Layer Mask, Layer - Layer Mask - Hide Selection.
Step 4 - Shadows
Create a new layer on top of all the others, select the Rectangular Marquee Tool (M), create a selection of the bottom part of the wallpaper just under the text, then with the Brush Tool (B), a soft rounded brush and black for the color and paint just under the text to create a shadow. When you like the result rename this layer Shadow 1 and duplicate it.
Rename the duplicated layer Shadow 2 and with the Free Transform Tool (Ctrl+T), right click on the selection box and select Flip Vertical then move the shadow on just on top of the previous shadow and downsize it a little bit. Change the opacity of both shadow layers to 70%.
Step 5 - Colorfull Gradient Circles
Let's add some color and shapes to this wallpaper; in this step we'll create some Colorfull Circles using the Gradient Overlay layer style. Start by selecting the Ellipse Toll (U) and create a perfect circle on the text, hold the Shift key while creating the circle, then add a Gradient Overlay and a Drop Shadow layer style on the circle layer, Layer - Layer Style - Gradient Overlay and Layer - Layer Style - Drop Shadow with those options:

Make sure you change the opacity of the layer to 70% and the Fill to 0%.
Next we'll add a layer mask on the circle layer to hide the part that's not on the text, make a selection of the bottom part of the circle, then create a Layer Mask, Layer - Layer Mask - Hide Selection.
To finish duplicate this circle layer but delete the layer mask on the duplicated layers, you don't need it, you can play with the colours of the Gradient Overlay, I created two different gradients. Place the circles where you want on the wallpaper, Use the Free Transform Tool (Ctrl+T) to resize the circles.
That's it for this tutorial; I hope you've learned some new tricks and techniques. Leave a comment if you've got a question.


![[Hack] Fifa 14 v1.0.2 for iPhone/iPad/iPod NO JB](https://blogger.googleusercontent.com/img/b/R29vZ2xl/AVvXsEh3DLN_lhqJ62My7UH5erbJNyGNNaU660uTpwmIsPpOYFXUqvaZNL6LGlhZAjntjPnTe50mfd2yqnRFlyz-S3GDrjlv6OdmMCL493dUParZhydZtrW_YnvIdnM-E2KdJ_IuymqcrjECii3n/s72-c/fifa+14+unlocked.jpg)


0 comments: